VBS Decoration Ideas
Tabletop Barn Display
§ Remove both flaps of a red project board. Create barn doors by cutting a square of a removed
flap then paint or use white tape around the edge and down the center. Make sure an ˝X ˛ is on
each door from corner to corner.
§ Create the roof by finding the center of the board as the peak of the roof. Measure both
directions to the board edge. Locate the center of
both halves. Mark that spot two inches from the
top of the board. Using a ruler, draw a line from
the top (peak) of the board to the second mark, and
then extend the line down two more inches to the
side. Cut along the roof line then tape along this
edge with white tape.
§ Use the previous removed side of the project board.
Transfer the fence patterns to the side pieces. Use
an Exacto knife to cut out the fence. Reattach the
fence to the bottom of the barn on each side so the entire prop will stand up. Embellish the
barn and fence with theme stickers.
Weather vane
o Copy the pattern to black poster board. Cut out the shape and attach to a black
wooden skewer. Tape (on back) the skewer to the top of the roof.
Windmill
o Locate the train station scene setter from Boomerang Express. Cut around the
windmill to remove it. Glue the windmill to foam core board. Cut a triangle prop
and tape it to the back so the windmill will stand on the table. Be sure the prop can
hinge and move side to side for packing flat.
Campsite
Campfire
o Place a 24 ˛ x 24 ˛ piece of paste board (used box) flat on the floor. You can make a
smaller or larger campfire if desired. Draw a circle on the pasteboard (base). Use spray
foam insulation to make rocks slightly larger than a man ˇs fist. Imperfections are
welcomed yet try to avoid peaks, points, or curly Q ˇs. When the rocks have been
created around the circle, let stand until completely dry (overnight).
o Use flat black spray paint to coat each rock and center of fire pit. After the paint dries,
use grey and brown to spray the rocks lightly for a realistic look. Option- textured spray
paint is very effective too.
o When paint is completely dry, cut off pasteboard from the outside edge of the rocks
leaving the rocks and fire pit intact.
Logs
o Collect paper towel tubes and other tube sizes for variety. Stuff each tube with
newspaper, cover ends of the tube, then the outside of the tube with wood grain
contact paper. Place in the fire pit with yellow and orange tissue paper as fire.
o Optional: Use real logs, spray paint swim noodles or roll up newspaper into logs then
wrap in brown grocery sacks and draw with markers.
Backdrop
o Using the line drawing, project the sunset onto a queen size tan sheet. Use spray paint
to create the sky with a sunset and brushes to paint the ground area. Add grauments
across the top for easier display.
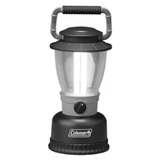
Lantern
o Enlarge the lantern pattern.
Use spray adhesive to
attach the paper to foam
core board or pasteboard.
Cut around the pattern and
tape a triangle shape to the
back as a prop.
Trees
o Create these silhouetted trees by using black foam
board. Lay two boards on the ground (landscape)
stacked. Hinge the boards with tape. Now stack the
third piece (portrait) on the top then hinge with tape.
o Transfer the tree pattern to the back and cut out the
tree.
o Paint the front with green craft paint as indicated on
the pattern.
o When paint is dry, use self adhesive Velcro dots to
attach a couple of yardsticks or wood strips for
strength. Secure the tree to a microphone stand or
chair so the tree will stand.
o Optional: Make two trees and cut a slit halfway up one tree and a slit halfway down on
the other tree. Slide the two trees together so they make one tree and stand without
other supports.
Additional props:
o Tents, a couple of lawn chairs, green sheets to be a ground cover (Amazon Outfitters
homemade backdrops can be recycled for ground cover).
Star Stable
.
Create two stable gates (front and back) with construction foam board about 32 ˛ high
and 36 ˛ wide. Use a hot knife to melt the board shapes on the gate and frame of the
gate. Permanent markers will also work if a hot knife is not available.
.
Create six fence boards from the foam board material to be attached to the sides of the
gates (three on each side). The boards will need to be six inches wide and four feet long
so the inflatable pony can fit inside the stable. Paint the boards to match the gates and
assemble using velcro dots.
.
Create the tall overhead portion of the gate by using two five-foot pieces of one inch
PVC pipe (side poles) and one piece (top pole) the width of the gate (36 ˛). Purchase two
elbow connectors. Assemble the pieces and spray paint silver or brown. Attach to the
back of the front gate with tape. Anchor the gate by taping a chair or weighted box to
the backside of the gate.
.
Make an overhead sign from brown paste board and hang it with jute or rope.
.
More stables can be made to sit side by side.
o Option: Convert the ticket booth from Boomerang Express into a stable by cutting two large
square holes (one in each panel so windows are side by side) in the construction foam
board. The large inflatable horse can stand with his head out the stable gate. Paint the
exterior of the ticket booth to resemble wood planks. Embellish with a black permanent
marker. Press down firmly to create indentions to define separate planks of wood. Attach
the roof and posts the same as the ticket booth.
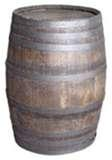
Barrels
§ Purchase a round collapsible laundry hamper. Spray paint silver
(metal barrel) or brown (wood). Use a permanent marker to draw
lines to embellish the barrel.
§ Option: Half a tan twin size sheet. Draw lines as wood planks.
Join the two sides of the sheet with hot glue. Slip over the
hamper and inside. Use silver or grey duct tape for metal rings on
the outside of the barrel. Place half of a light blue vinyl table cloth
inside for water in the bottom of the barrel.
Hay Bales
§ Choose a common size box for packing your conference materials. A copy paper box is
recommended. Place a yellow or tan King-size pillowcase over the box. Paint or use markers to
draw streaks of browns and darker yellow to resemble the straw. Stipple (paint) the ends of the
box to resemble the cut off straw. Paint two silver binding straps or use duct tape (rip in half).
Place the pillow cases over the box after they are emptied, and then place these hay bales
among the decorations.
§ Optional: Use a Hula Skirt or raffia as the straw. Open the skirt flat to the floor. Place the two
strips of duct tape on top of the grass (one third and two thirds). Cut away the top waistband.
Glue behind the tape lines and secure to the pillowcase while on the box. Press well for contact
to the fabric. Let dry completely.
§ Optional: Purchase miniature hay bales from the craft store but do not remove the plastic. This
helps with clean up and allergies.
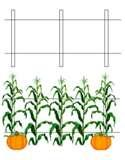
Cornfield
§ Roll tubes of large green paper and attach to a sheet of green bulletin
board paper the length of your fence. Use self adhesive Velcro dots to
attach the tubes if you plan to remove and reuse. Cut out leaves and
corn husks from paper using the pattern. Attach leaves, corn husks,
and tassels to the tubes and paper backdrop. Decorative corn can be
used. Attach the scene to the wall and place the fence in front.
Fence
§ Create a split rail fence by drawing out two posts with two rails in between on foam insulation
board used in home construction. Cut out the fence section and paint with brown latex paint.
One sheet of foam will make two sections. Cut out extra rails to attach with Velcro dots
between the sections. Lean against the wall with scene setting behind.
§ Use a poster with the theme logo and glue it to a foam core board. Cut around the logo and
attach to the fence. If the poster is not available, enlarge the logo from this handout or go
online at www.lifeway.com/vbs to download the logo.
§ Optional: hang some rope around the fence post. Order leather barbwire from Oriental Trading
to string across the top row of fence. Add bushel baskets with decorative corn.
Scarecrow
§ Enlarge pattern on paste board or foam board. Glue buttons for
eyes and nose or use a marker to draw all of the facial features.
Attach a dowel road across the shoulder for arms. Dress with
shirt, overalls, hat, and gloves. Use Velcro dots to secure as
needed. Stand the scarecrow with a microphone stand or easel.
§ Cut a crow from black foam core and add to the hat or shoulder.
Paint a red dot for the eye.
§ Create a photo spot for a child by providing space to stand next to
the scarecrow with a hat on his head too (include a crow if
desired). Young children can sit on the floor with the bushel baskets and corn or on a hay bale.
Chuck Wagon
o Cover a six foot table with a brown sheet (choose a different
color is you prefer). Make sure the sheet reaches the floor.
Now measure 12 inches from the top of the table down. Paint
wood planks to be the box of the wagon. Wood-grain printed
table cloth can be purchased to lie over the table 12 inches.
Paint greens and yellows on bottom of the sheet for the grass
(at least 12 inches high).
o Make or purchase wagon wheels to stand on the floor next to the table or attach to the
cloth with Velcro dots.
o Use a twin-size tan sheet or unbleached muslin for the cover. Sew or glue casings (loop or
sleeve) at each end of a sheet to insert swim noodles (the kind with holes in the middle).
Cut three lengths of 1 X 4 boards the width of your table. Drill holes in each end of the
boards to insert 6-inch dowels. Secure the boards to the table with duct tape. Place the
boards on each end and the center of the table. Insert each end of a swim noodle over the
dowels in the middle board. Insert the fabric encased noodles over the dowels in the end
boards.
o Cut grass clumps from foam board. Paint the blades of grass with light gold and green colors
starting at the bottom and pulling the brush upward to a point for each blade. Place these
around the wagon wheels.
o Optional: Add the chuck wagon feature to the back of the wagon by using a card table but
open two legs and set the other edge on the wagon (table). Place red and white table
cloth, cooking kettles and eating utensils on the table.
Caverns
o Purchase a king-size tan sheet or use large paper. Lay the sheet flat on the floor and begin
crinkling the sheet like an accordion fold but not straight. Lightly spray paint the sheet with
browns (dark and light shades) and even black. Open the sheet and let dry. Repeat this
process several times until you have achieved the craven wall affect of cracks and crevasses.
o Repeat this same process for several smaller sheets to use as stalactites. When dry, drape
the sheets over easels and/or long tables standing on one end. A triangle point will need to
be taped to the table before the sheet is draped over it.
o Leader can wear a construction helmet with an aluminum mini pie pan attached on the
front. Glue a white Styrofoam ball which has been cut in half, to the pan as the light bulb.
o Optional: Lantern prop can be used here as well.
Site Signs
o Print sign on ledger-sized paper with wood-grained background. Decoupage the sign onto
the foam insulation with white glue. After the glue is dry, trim the edges to resemble the
jagged ends of a wood plank.
o Sign Post: Cover wrapping paper tubes with wood-grained contact paper or draw wood
grain and knots with a brown marker. Slip the tube over a new plunger. Add some greenery
to conceal the base or wrap with burlap and tie with jute. Attach the sign with Velcro dots.
Entrance Gate
o Create the rock posts by wrapping two identical boxes (copy paper boxes work well) in black
paper or spray paint the box flat black. Cut square and rectangle stones from grey
construction paper. Stand the box on one end the glue the stones to the box in rows on all
three sides. The top can be covered with the box lid and all gray to look like a capstone. Cut
a hole large enough for the post to go through.
o Purchase three down spot tubes in brown. Cut to seven feet each. Place the tube through
the top opening of the stone box and into a tub of open fabric detergent. Place the third
tube cross the top of the posts. Secure with jute or rope.
o Hang the theme poster from the center and enlarge the ˝brand ˛ on brown paper to hang in
each corner.
o Optional: Add fence, inflatable horses and greenery to the rock posts.
Table Top Ranch Entrance
o Use the pattern above and transfer to a project board. Use the brown (back) side of the board.
Cut away the timbers and place a black rectangle as stone post. Glue on small grey stones. Cut
out fence from the flap of the project board. Attach the ˝Brand ˛ to the timbers.
Bunk House
Fireplace
.
Cut a six to eight foot tall sheet of construction foam board to the desired width of your
fireplace. Next, cut the fireplace into three sections that are smaller and more mobile
or easier to store. On the back, label each section (top, middle, or bottom) to help
during set-up. Make a stone pattern or two from paper to trace stone shapes onto the
foam. Use a black permanent marker and press down into the foam to help the stones
look raised. Paint the stones with latex or craft paint. Use a solid gray then let it dry.
Next, take dark browns and black to go around the edges of each stone. This will help it
appear more three dimensional and realistic. When the paint has dried well, go over
the mortar cracks with a black or gray permanent marker.
.
To create the firebox, spray paint the inside of a copy paper box with flat black (not
gloss). To create the opening for the firebox, place the lid of the copy paper box on the
floor then place the firebox on top. Hold the foam board up to the box and trace
around the box then cut the opening smaller than the traced line. The lid will hold the
fire box off the floor for a better effect. Tape the firebox to the back of the stone then
place logs and faux fire inside the fireplace.
.
The mantel can be made from foam board approximately five inches wide and painted
brown. Use wooden skewers to attach it to the stone wall by pushing the skewers into
the back of the mantel then through the stone wall. Place very light weight objects on
the mantel.
Rug
.
Choose three colors of large bulletin board paper. Carefully tear an oval shape to the
size of rug you desire (bottom piece). Tear the next (middle piece) color a few inches
smaller and the last color a few more inches smaller to be the top piece. Assemble all
three pieces by gluing the together. Along the torn edges of the top and middle pieces,
use a black marker to make a series of ˝Xs ˛ all the way around as the stitching. Be sure
the ˝X ˛ is on both pieces.
Window
.
Take a full sheet of brown poster board and draw out four window panes. Cut and
remove the four squares to leave the brown window frame. Option: laminate the
poster board to be the glass. Attach two pieces of country print fabric as curtain panels
using velcro dots. Option: Use two sheets of brown poster board to make a double
window or a larger window. Fabric can also make a valance panel as well.
Couch
.
Push three chairs together and cover with a quilt. For a more realistic look, lay other
blankets across the chair seats and across the top of the chairs then cover with the quilt
to look more full. The room can also be decorated by hanging quilts and using décor
tables or boxes covered with table cloths.
Notes and Ideas